Tonal Fair Isle Halloween Stripe Scrubby Knit Free Pattern
Introduction
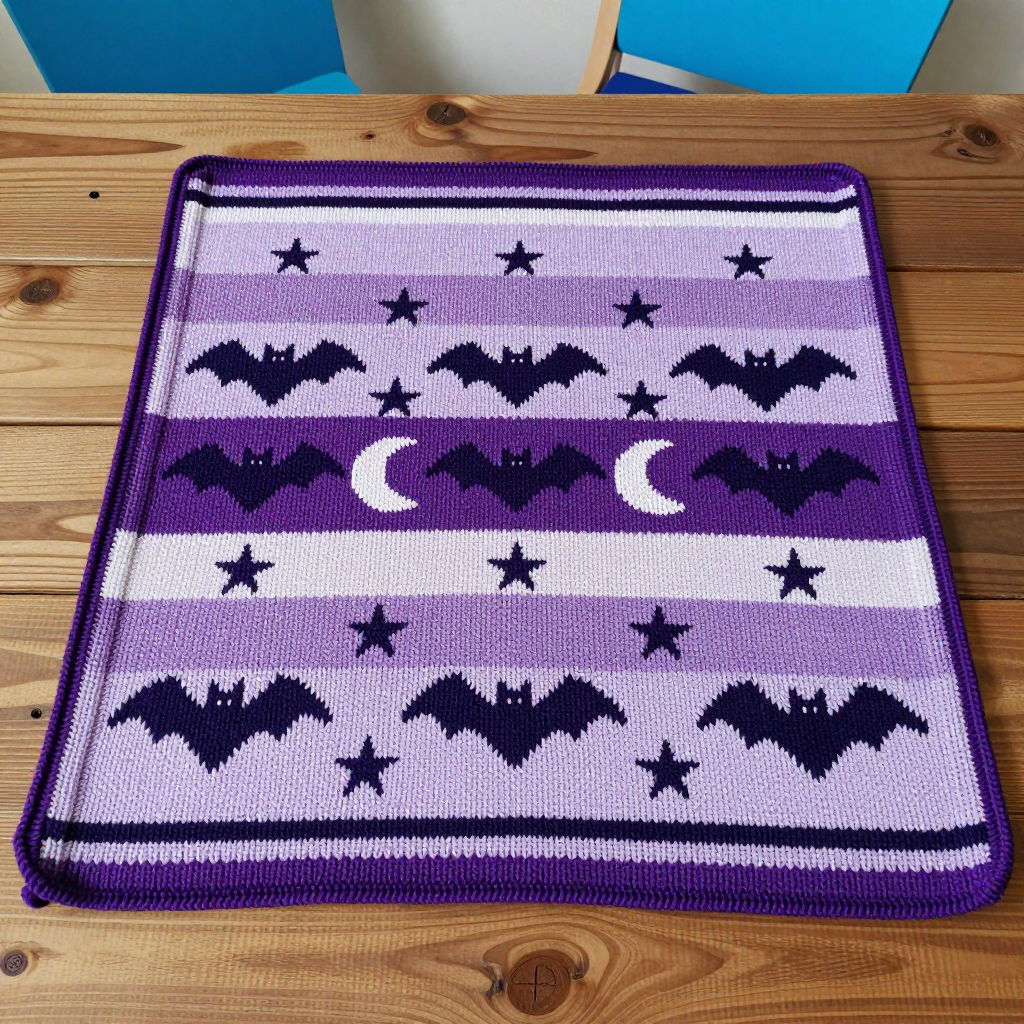
This Tonal Fair Isle Halloween Stripe Scrubby is a beginner-friendly rectangular dishcloth that lets you dip your toes into colorwork without any shaping, seams, or scary techniques. It's perfect for knitters who have just learned to knit and purl and want to try stranded colorwork for the first time, and it makes a charming little gift for anyone who loves Halloween. The cloth works up in horizontal fair isle bands of bats, moons, and stars, shifting through a gradient of lilac tones from light to deep purple and back again. The smooth stockinette body feels soft and dense in worsted cotton, while the narrow striped garter edging gives it a clean, streetwear-inspired finish that looks great hanging by the sink.
Materials Needed
- Yarn: Worsted weight cotton, 4 colors: A (light lilac) 50 yds, B (medium lilac) 40 yds, C (dark lilac) 30 yds, D (deep purple) 20 yds
- Needles: 4.5 mm (US 7) straight needles
- Notions: 2 stitch markers, a tapestry needle for weaving in ends, scissors, and blocking pins or mats
- Finished size: 8 inches wide x 8 inches tall
Abbreviations
- st(s): stitch(es)
- k: knit
- p: purl
- RS: right side (the front of the cloth)
- WS: wrong side (the back of the cloth)
- pm: place marker
- garter st: knit every row, which makes a ridged, reversible fabric
- stockinette st: knit on the RS rows and purl on the WS rows
- fair isle (stranded colorwork): working with two colors in the same row, carrying the unused color loosely across the back
Gauge
20 sts and 26 rows = 4 inches in stockinette. Knit a small swatch in stockinette, block it gently, and measure a 4-inch section in the middle to check that your stitch and row counts match before you begin.
Tips Before You Start
- Keep the floats (the carried yarn across the back) loose. If you pull them tight, the cloth will pucker and shrink in width, so stretch the stitches gently on the right needle as you go.
- Wind each color into a small ball before starting so the strands don't tangle as you switch between A, B, C, and D.
- Count your stitches at the end of every motif row. The 3-stitch garter borders in D stay constant, so any change in count means a dropped or added stitch.
- Cotton has little stretch, so work a little more loosely than usual and trust your blocked gauge rather than tugging the fabric to size.
Step-by-Step Instructions
Main Cloth
Set-up: With color A, cast on 41 sts.
Rows 1-4 (edging): Knit every row in garter st, changing color every row in this order: Row 1 with A, Row 2 with B, Row 3 with C, Row 4 with D (41 sts).
Next row (RS): K3 with D, pm, work Chart A across the next 35 sts, pm, k3 with D (41 sts).
Chart A (bat motif), Rows 1-8: Work the 8 rows of Chart A across the 35 center sts in colors B and C, keeping the first and last 3 sts in garter st with D on every row (41 sts).
Chart B (moon motif), Rows 1-8: Work the 8 rows of Chart B across the 35 center sts in colors C and D, keeping the 3-st garter borders in D (41 sts).
Chart C (star motif), Rows 1-8: Work the 8 rows of Chart C across the 35 center sts in colors A and B, keeping the 3-st garter borders in D (41 sts).
Charts A-C, second repeat: Repeat Charts A, B, and C once more in the same order and color assignments (24 rows total; 41 sts).
Edging, Rows 1-4: Knit every row in garter st, changing color every row in this order: Row 1 with D, Row 2 with C, Row 3 with B, Row 4 with A (41 sts).
Bind off: Bind off loosely in color A.
Assembly and Finishing
This cloth is knitted as a single flat rectangle, so there is no seaming. Weave in all ends on the wrong side, running each tail through a few stitches in the same color so it disappears into the fabric. Block the cloth to 8 inches wide by 8 inches tall: soak it in cool water, gently squeeze out the excess, pin it to measurements on a blocking mat, and let it dry completely. Blocking opens up the fair isle bands and evens out the garter edging for a crisp, professional finish.
Pro Tips and Variations
- Swap the lilac palette for classic Halloween orange, black, and charcoal for a bolder, more traditional look.
- Add a hanging loop by chaining or casting on a few extra stitches at one corner before binding off, then bind them off to form a small loop.
- Work the cloth in a slightly larger needle size to make a looser, quicker-drying scrubby, or add a thin strand of scrubby yarn held together with the cotton for extra texture.